Let them have Polish did an awesome spun sugar mani, based on the tutorial found on The Polish Well. I really want to try this using blues and purples!
Poliship did a lovely palm tree manicure as part of the Summer Fun Challenge.
The Anglophile in me is completely enamored with this Union manicure from Nailasaurus, and the accompanying tutorial.
Chit Chat Nails added a tutorial of her own for a saran wrap mani.
Over on Chalkboard nails, there's a great example of galaxy nails. If you want to try your own there's a (unrelated) tutorial right here.
Tuesday, July 31, 2012
Monday, July 30, 2012
Friday Finds?
Okay.
Um. So...yeah.
What happened to Friday? Because you know, I could swear it was just Tuesday and I was talking myself out of prepping this post because it was "too early." Seems I should have listened to myself.
But, nonethless, here's the rundown. I included the Essie I bought last week, since I realized I hadn't shared it with you yet.

Left to right:
Bath and Body Works Cherry Blossom kit, including lotion, and shampoo and conditioner for dry/color treated hair. (Free!)
Burt's Bees Tips and Toes Kit ($12.97, Walmart)
Finger Paints "Tiffany Imposter" ($5.99 regularly, $4.49 w/Sally card, Free with gift card! Sally's Beauty Supply)
Sally Girl [unnamed pink polish] ($.99 regularly, $.94 w/Sally card, $.43 with gift card. Sally's Beauty Supply)
Essie "Exotic Liras," "Sequin Sash," and "Luxedo" ($3.99 each, Marshalls)
The bath kit was given to my mom by a friend, and since it's one of my favorite scents and one of the few that I'm not allergic to, she passed it on to me. I really can't wait to try it and see how the shampoo/conditioner stacks up against some of the others I've used, since I've only ever used the lotion/bodywash from B&B. In fact, I haven't even used those in ages, because of my fragrance allergy, with the exception of the White Tea and Ginger lotion I got eons ago and keep having to cut with unscented lotion. I can't be the only one out there with this problem, can I? Please tell me that I'm not the only person who is in danger of not breathing every time they walk past the perfume counter at Macy's.
I've already broken into the Tips and Toes kit, and so far I love it. I think I'm officially a fan of Burt's Bees, and this after years of just not being impressed by their stuff. Obviously, my friends were holding out on the good stuff when they were kept handing me things to try. Later this week I'll give you the full details on this kit--or you can skip ahead now and get one of your own!
I'm toying with the idea of doing nail art involving "Tiffany Imposter" and that little bottle of pink....We'll see what I come up with.
Toodles!
Saturday, July 28, 2012
Geek Nail Challenge
I just wanted to remind everyone about the Geek Nail Challenge:

Week 1: Comics and Animation
My Little Pony? Naruto? Batman? What tickles your geeky bone?
Week 2: Television and Movies
From the Lord of the Rings to Big Bang Theory, celebrate the nerdy side of Hollywood.
Week 3: Games and Gaming
It doesn't matter if you prefer Alice or D&D, or if Trivial Pursuit is more your speed. It's all about having fun!
Week 4: Ultimate Geek
We all have things we love--books, movies, games--but what is it that makes you a geek? Are you a math nerd? A science geek? Or are you just a fan of other geeks? (P.S. Nail polish is chemistry. Chemistry is science. It totally counts for geekdom!)
Since each week has a theme, you can post one manicure on Monday (or Friday, or whenever is convenient) or, if you're like me and having trouble choosing just one thing, you can post seven manicures (one every day!) if that floats your boat.
If you would like to sign up, please leave a comment here with a way that I can contact you!
Friday, July 27, 2012
Lux

I meant to post yesterday, but things kind of fell apart on me. I wound up spending twelve hours at my parent's house (sans laptop) doing laundry (normally it takes 6-8). No blogging or nail polish-ing, but I did do a lot of reading and finished a knitting project.
I had to trim my nails way down earlier this week, so to make myself feel a little better, I painted what was left with some new Essie:

These are two of the colors I found at Marshalls last week: "Luxedo," and then I went against my natural inclination and got "Sequin Sash."
Normally I'm not one for anything in the sheer, gold, or shimmer families, but I like this one for layering. I should have done two coats of it though, to make it pop just a little more.

"Luxedo" is a deep, dark grape-plum color in the bottle. On the nail, it can look anywhere from dark purple to burgundy to black depending on the lighting.
It went on pretty easily, but I discovered that some nails required a third coat to even them out (in this case, the middle and index fingers). Two did a pretty good job in most cases, but I hate having any inconsistencies in the color.

"Sequin Sash" is warm, sheer gold shimmer with just a pinch of microglitter thrown in. It's not as intense of a shimmer as the Cover Girl "Rose Quartz" that I used on my tropical drinks mani, but that doesn't bother me.
Hopefully, now I can get back on track. I'll probably skip a couple of the Summer Fun challenges, though, because honestly I've been drawing a blank on the last couple of prompts.
But never fear, I've got other stuff planned.
P.S. Have you signed up for the Geek Challenge yet?
Wednesday, July 25, 2012
Summer Fun: Sea Creatures

It took me a while to figure out what I wanted to do for this one, since I'm not much for sea life (partially because I live in Ohio). But, as a cancer, I have an affinity for the crab.

Colors used:
Blue: Sally Hansen Insta-Dri "Blue By"
White: Maybelline Color Show "Porcelain Party"
Orange: Sally Hansen Hard as Nails Xtreme Wear "Sun Kissed"
Brown: S•X•Y "Dreamy Cocoa"
Green: Sally Hansen Insta-Dri "Just in Lime"
Black: Claire's Nail Art Pen
Red: Sally Hansen Diamond Strength "Diamonds and Rubies"
Topcoat: Seche Vite
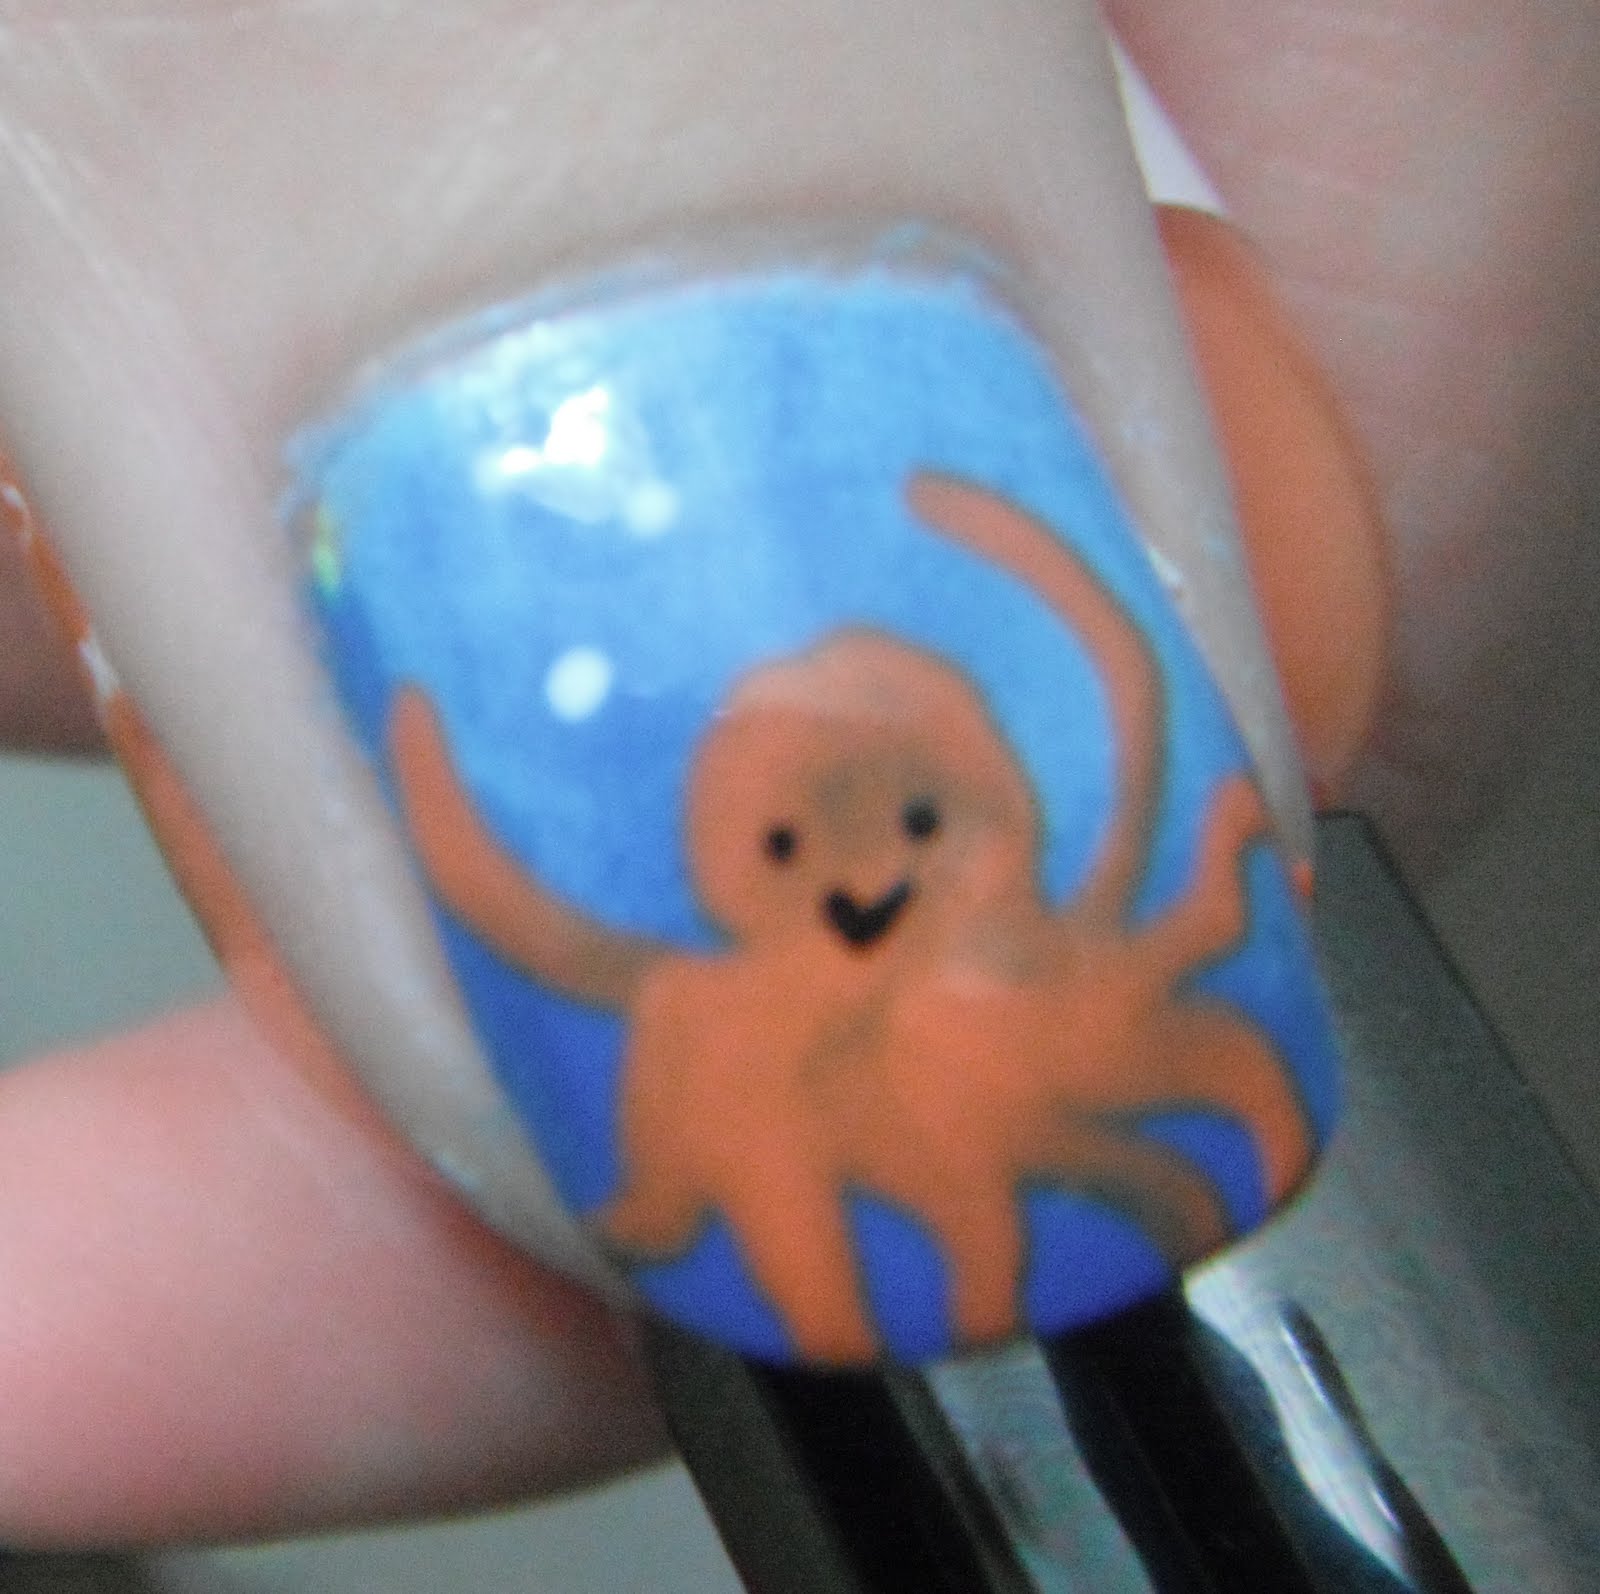
For the background, I sponged on a 3/1 mix of the white and blue. The rest is all bottle colors. I used a toothpick to add the bubbles. Everything else is freehand. Start to finish, this took about an hour and a half, mainly because my base color was a quickdry, and that saved a lot of time.

Unfortunately, the weather is pretty crummy today, which is throwing off my lighting. I had to tweak some of these shots a little just to get the details to show up. The crabs are much easier to see in real life.

---
Are you looking for something to do after the Summer Fun Challenge is over? Why not join me in the first ever Girl on a Shoestring Challenge?

Week 1: Comics and Animation
My Little Pony? Naruto? Batman? What tickles your geeky bone?
Week 2: Television and Movies
From the Lord of the Rings to Big Bang Theory, celebrate the nerdy side of Hollywood.
Week 3: Games and Gaming
It doesn't matter if you prefer Alice or D&D, or if Trivial Pursuit is more your speed. It's all about having fun!
Week 4: Ultimate Geek
We all have things we love--books, movies, games--but what is it that makes you a geek? Are you a math nerd? A science geek? Or are you just a fan of other geeks? (P.S. Nail polish is chemistry. Chemistry is science. It totally counts for geekdom!)
Since each week has a theme, you can post one manicure on Monday (or Friday, or whenever is convenient) or, if you're like me and having trouble choosing just one thing, you can post seven manicures (one every day!) if that floats your boat.
If you'd like to take part, please leave a comment below with a way I can contact you with the InLinks link.
I'm excited, how about you?
Tuesday, July 24, 2012
For the Newbies in the Room
When I started nail blogging (I know, all of a month ago) I really had no idea what I was doing. I didn't know anything about the new nail products that have been released in the past ten years. I'd never even heard of stamping. It never occurred to me to use a tiny paintbrush to freehand stuff on your nails, rather than the brush the polish came with. I thought I was getting fancy when I layered a glitter polish over a creme, and I still don't have a clearly defined image in my head when someone mentions "jelly" polish.
So while this is old news to most of you, today I want to say a couple of things about Seche Vite that I wish someone had told me when I first got started. It would have saved me a lot of grief and a few bucks on inferior topcoats. If you already knew this, then feel free to skip this post. If you're asking "Seche who?" then please keep reading.
Seche Vite is awesome.
If you've been reading nail blogs, then you've probably gathered at least that much by now. Everyone talks about it, but very few people actually say what it is:
Seche Vite is a quick-dry topcoat. Depending on where you find it, it ranged between $5-7, and it is worth every penny. It can be found at some drug stores (so I've heard), and I've also seen it at Giant Eagle and Target (that's where I've found it the cheapest).
Why is it different from other topcoats? To be honest, I'm not sure. There's something in the formula that is way above my pay grade to figure out (I'm an artist, not a chemist). But as soon as you open the bottle, you know that there is something different in this one. It doesn't smell like polish. It smells...more like spray paint. I think it's a true lacquer, rather than a polish, but since most of my bottles are missing their ingredient lists, I can't tell you what the magic ingredient is. But know that it is there, it works, and that this is chemically different from every other topcoat on your shelf. Sally Hansen can't hold a candle--trust me.
SV is a topcoat that is meant to be applied thick. It makes me think of clear resin when I put it on, and just like it says on the box, it dries super fast--under a minute.
I've tried other quick dry top coats. Usually they peel off, or they smear the fancy designs I've worked so hard to produce, or, sometimes, they take longer to dry than the polish I put them over.
Not SV. It added 1-2 days of wear to my manicure, meaning that instead of chipping, flaking, and peeling off within 24-48 hours, even my most elaborate paint jobs lasted at least 2-3 days with minimal tip wear, and I'm pretty hard on my nails. As soon as it starts to chip, I have to pick at it. It's a compulsion. But not only did it hardly chip, even with a little--ahem--help, my polish wouldn't go anywhere. Tough as nails, indeed.
And even on newly applied polish, it doesn't smear patterns or designs.
So there you have it. Something that I wish someone had told me when I got started in nail art. Save yourself some trouble, spend the extra $2 on the good stuff, and watch the results improve.
Monday, July 23, 2012
Summer Fun: Favorite Beach Memory
Woops. I almost forgot about this post. That's what I get for writing it in advance and not adding pictures right away.
Well, that, and some really crappy pictures...

When I was seven, we went down to Florida to visit my great aunt and uncle. This was the first time I remember leaving the state (I went to Canada a few years before and apparently made friends with everyone on the train by virtue of being an adorable three year old who didn't scream or cry once in twelve hours, but I don't remember it). It was the first time I saw the ocean, the first time I went to Disney, and the first time I missed school for vacation.
I wish I could share the photo that this manicure is based on, but I don't have a copy.
We drove from Ohio to Florida, and stopped at Daytona Beach on the way for lunch. We got Subway (which back then was a real treat; they weren't all that common and were considered "expensive" fast food, according to my parents) and ate on the beach. I made a sand castle. My mom snapped a picture and in it, I'm wearing a two piece swimsuit covered in neon stripes and flowers. I was very proud of that swimsuit (I think it was my first two-piece suit, and I felt very grown up).

I have yet to find another suit that looks as good on me.
Of course, my body has changed a little since then. I'm not sure if it's an improvement sometimes (like when it comes to swimsuit and jeans shopping).
Colors used: Maybelline "Porceline Party" for a base; China Glaze " Celtic Sun"; Color Zone neon pink and purple.

I think that neon polishes have joined the ranks of classic red lips, smokey eyeshadow, and string bikinis: They're all things that I love...on other people. While I might hang on to the purple, I think that the pink and yellow will be joining the Giveaway stash I've been putting together (yes, I am planning a giveaway. But not until my followers passes the single digits. I'd like to have more than two people enter, unlike the last time I tried to have a giveaway on my blog).
What's your take on neon? Yay or nay?
Friday, July 20, 2012
Summer Fun: Tropical Drinks
I'm a little late on this one. I didn't know what to do for a summer drink at first, mainly because I don't drink and I don't get the whole drinking for relaxation and socialization thing. I'll occasionally do a virgin strawberry daiquiri, but that's about it.
I do love my fancy drinks, though. It's just that I tend to go more for the kid-friendly side of the spectrum: smoothies, flavored teas and lemonades, and my favorites: Milkshakes.
Now I don't do plain old vanilla or chocolate, oh no. I like things like mint chocolate chip, or my favorite, banana-chocolate. I already did mint chocolate for this challenge though, and brown and yellow are really not my colors. So I went with my second favorite flavor: strawberry chocolate
For my base color, I used Essie "Exotic Liras," and while it was a great pink, it was a little too bright to invoke the color of a strawberry milkshake. So I put a coat of my least favorite polish over top: Cover Girl Continuous color 3 in 1 "Rose Quartz."

I've had this polish for years, and I've used it maybe once. It's a super pale pink in the bottle, with almost no color whatsoever on the nail. It's heavy on the shimmer, not so much in the opacity. This was a color that I bought back when I wasn't allowed to wear bright colors on my nails, and I hated it from the get go. Not because there's anything wrong with the formula itself, but because I couldn't stand the color on me. Even four coats isn't enough to make it opaque.

But it was just right to make "Exotic Liras" go from come-at-you bright to frosty and ice-creamy.
I don't think I've ever layered this color before, and I'm glad I did. It's given me a new appreciation for it. Even the polishes I least like in my collection have a place, if used correctly. Like "Plum Paradise" and my glitters, I think that this is a color best suited to layering, rather than trying to use it all by it's lonesome. It's a codependent sort of polish, and that needs to be addressed in order to use it to best effect.

I freehanded the swirl pattern using S•X•Y "Dreamy Cocoa" and a toothpick (really wishing I had a set of stamping plates right now!). And of course, I topped it all off with Seche Vite.
Lust Objects
Mash Nails Dried Flowers
I love what ChitChatNails did with her new set of Mash Nails dried flowers. So pretty! And the price isn't bad either, considering the amount of pieces you get and the convenient, sturdy looking packaging.
Essie
My local Marshalls just started carrying Essie, and at $3.99 a bottle, I really had to pick up at least a few. I think these are from past collections (well, it is Marshalls. It's unlikely anything brand new would show up), and it was mostly neutrals and pastels. I did find a couple of nice bold colors to bring home, though, which makes them my first real Essie polishes (I do have Set in Stones, but it's just a clear base with glitter, not a "real" polish). I keep hoping they'll bring in something newer; right now I really want Overboard.
Konad Basic Kit
I don't remember who pointed out this kit earlier this week. I've been wanting to try stamping for a while, and this seems like a good way to get started.
Mei Mei’s Signatures SueSa Nail Polish S02 and Gosh Holographic
As seen on Chit Chat Nails/Polish Insomniac. It's silver. It's holo. You know the drill.
Once Upon A Polish
Imperfectly Painted recently reviewed "Scuttle" from Once Upon a Polish's Little Mermaid line. This was my favorite movie as a kid and Prince Eric is still my idea of the ideal man (What? Handsome, brave, rich, likes dogs and music, responsible but spontaneous, fights for what he believes in...I should just stop there). While it's sold out now, you can click through her sold items to see the rest of the collection. I love "Ursula" and "Flotsom and Jetsom."
Wednesday, July 18, 2012
Inspiration Shots
Wow, this post is so out of date. I've just had so much other stuff to talk about! But I still wanted to share with you some of the awesome stuff I've seen around the internet in the last few weeks:
Awesome underwater manicure from Chalkboard Nails.
Peace, Love, and Polish has two manis that I'm absolutely loving--this patriotic themed manicure, and a tropical one!
This black and white mani by Kayla Shevonne is just stunning.
Over on Deviantart, there's another tropical manicure I adore, and these beach scenes are so detailed.
Devart has just been tickling my geeky bone lately, what with this Fururama mani, Wolverine, and Superhero manicure. And then there's this sweet little Mary Poppins inspired one, and Gir!
There's even one inspired by Jack Sparrow!
This Alice in Wonderland manicure is one of the more visually complex designs I've seen lately, and I love the water color look of this one.
As a travel addict, I want to copy this map-based nail art so bad!
Tuesday, July 17, 2012
Summer Fun: Favorite Summer Memory

I want a manicure.
I'm not talking a, "Oh, look, I put pretty pictures on my nails." I mean a hand over hard-won cash so the cute Asian man with the indecipherable accent will massage things that smell nice onto my hands, make the peelies go away and give me pretty nails with pictures on them that I don't have to paint myself and won't break/tear/chip off in twelve hours. That kind of manicure. (Yes, it's a stereotype. Must most of the manicurists in my area are Korean. The one I went to when I had money was an engineer before the economy tanked, and he did lovely work. He's also one of only a handful that I've been to that I could understand more than one word in three.)
I kind of destroyed my hands at work today. I was moving fixtures and merchandise all day, and tore up my knuckles. At the moment, it's not too visible, but I sure felt it when I was washing dishes. My hands are so bad right now that I took that Burt's Bees Lemon Butter I talked about last week and rubbed in all over my hands in the hope that it would help with the dry skin, hang nails, and cuts and scrapes. And the peeling nails I've been fighting for about two or two and a half months have decided to come back with a vengeance, despite all I've been doing to prevent them (cuticle treatments, nail hardeners, conditioners and strengtheners). I actually can't cut my nails any shorter. I've tried. But they just keep peeling.
So I paint them to cover it up.

My favorite summer memory is an internship I did as part of my undergrad. I was a struggling art student, feeling lost and depressed at the end of my second year of school. I didn't like my major and had realized that art--as the administration defined it--wasn't how I wanted to spend my life, but in the back of my head I just kept hearing my dad's voice telling me what a mistake art school was, and what a waste of money since changing majors (and by definition changing schools, since mine only taught art) would mean starting from scratch as far as classes, loans, and grades, not to mention I had no idea what exactly I would major in instead.
At that point, I'd been knitting for about a year and a half. I had discovered knitting blogs, though I didn't yet have one of my own. I'd been designing my own projects, though at that point I don't think any of them were actually written down as patterns. I was scouring the web for more information about knitting--my one creative outlet that didn't involve a critique and a bad grade.
On my way out of printmaking class one day, I saw a flier for the TNNA PiPN Internship Program, which allowed students (primarily fashion majors, but others as well) to intern for various fiber arts companies doing things like sales, making samples, and sometimes even design work. I applied and was sent a list of participating companies. Lo and behold, at the bottom of the list was a single international opportunity: CNS/Mission Falls in Montreal, Quebec Canada.

I'd been dying to go back to Canada since my grandmother's funeral a few years before. I spent several weeks with crossed fingers, waiting to see where I'd be assigned.

The internship began with three weeks of training in Akron, Ohio in knitting, crochet, embroidery, cross stitch, and needle point before we were sent off to our designated locations.
My boss was kind enough to let me stay in his "winter" house, a duplex in the Plateau area of Montreal (very nice neighborhood).

That was my first time truely being on my own and away from home. I fell in love with the city. I learned so much about the world and about myself. I wrote 3/4 of the first draft of what would eventually become my first novel. I picked up sewing and haven't truly put it down since, and I absorbed every knitting technique I could find.
I could time the buses to the second. Public transport was affordable. Produce was fresh and delicious, everything was within walking distance and the things that weren't were easily accessable through the metro.
And then there was the underground city.
Google it. Seriously.

Festivals every week, international culture, buildings from the 1600s, and my favorite uncle an hour away for the only time in my life. I improved my French, met some amazing people, and spent every Sunday on the Mountain, watching LARPers, listening to drum circles, dancing, and shopping handmade goods.

Colors used:
Revlon #460 "Mysterious" (blue, thumb)
Maybelline Color Show "Porcelain Party" (white)
Essie "Exotic Liras" (pink)
Sally Hansen Diamond Strength "Diamonds and Rubies" (red)
Miliani Neons "Rad Purple" (purple)
Sally Hansen Insta-Dri "Just in Lime" and "Blue By"
Sinful Colors "Happy Ending" (green, sponged on top of "Just in Lime")
Cityscape done by blending S•X•Y "Dreamy Cocoa" with "Porcelain Party" and Pop Beauty "Black"
Claire's nail art pen for details (black)
Seche Vite for a topcoat

I tried doing an alcohol transfer like this one for the map, but none of the maps I had were printed using the right ink. So instead, I took the piece of map I'd softened with alcohol, tore off a small portion, and laid it over top a fresh coat of white polish. I sealed it in with 2 coats of Seche Vite. I used manicure scissors to neaten the edges and trim it to shape.
This happens to be the only time I've wished for those ridiculously long talons that are absolutely useless for everything but nail art. I wish I could have printed more of the map and shown a little more detail with the cityscape.

Just a break down:
thumb: Quebec flag
index finger: one of the yarns I was promoting, Mission Falls Tricolor (it's really hard to see with the topcoat, but there's red and purple on a pink base. The yarn is very pretty and I wish I still had some)
middle: map of the city
ring: cityscape and the mountain
pinky: maple leaf
 Fini. Merci de lire.
Monday, July 16, 2012
Love & Hate
So we all know about my love affair with metallics and foils. I first fell for these polishes back in high school. I liked polish then, but I wasn't a polishaholic. I think I owned six: red, black, light pink, burgundy, blue metallic (the one from the above blog post), and black glitter.
I don't remember seeing a lot of metallics or foils then. Shimmers, glitters, sure. But a real metallic? Not so much. But then, I had a rather sheltered upbringing, so I could have missed out. And like I said, I wasn't obsessive back then.
Then I had about five years in college where I couldn't/wasn't allowed to wear polish. I moved four times a year (Yes, that equates to 20 moves in five years. Well, I guess it would be a little less, since there was a year we had an apartment, but still. It would be about 18), and never once brought a polish with me.
Fast forward to today, and I'm discovering all of the things that have come out while I was out of the loop, and finding stuff beyond what is available on the shelves of a small town Walmart.
And a lot of things that just weren't there the last time I looked.
Case in point: Wet n Wild "Metallica"

I picked this color up a few weeks ago to do accents for the Teen Titans manicure, and realized the other day that I had yet to swatch it on it's own. Curious, I sat down and did just that.
I love the formula of this polish. I hadn't tried Wet n Wild before (except for the bits and pieces that made it into that manicure), and I think I might have new go-to el cheapo polish, since our Walmart has stopped stocking Pure Ice in anything but pearly shimmers in pinks and neutrals.
The first coat goes on very sheer and streaky, but don't let that dissuade you! The second coat evens it out, and you could wear it with just two. I tried three, just to see if I could get it a little more intense, and I'm glad I did. Three coats gives full opacity, and there's not a streak in sight (any streaks you do see are actually from my top coat, which is the Sally Hansen Insta-Dri).
In shadows or ambient light, this polish reminds me of a silver alloy that has a copper base--just a slight pinkish tone to it. But put it in the sunlight and BAM, there is no doubt that this is metallic silver!
The one drawback I found is that it doesn't stand up very well to wear. I had tip wear almost immediately (this after just typing and some knitting), and it peeled off after 24 hours, with some pieces just flaking off in chunks like it couldn't get off the nail fast enough.
Overall, though, I love this polish, and I'm going to have to go back to Giant Eagle to see if they have more metallics in other colors.
For the accent nail, I used two coats of "Metallica" with two coats of Sally Hansen Hard as Nails Xteme Wear in "Night Lights." This is actually the glitter polish I bought all those years ago, and there is a very good reason that I haven't used it up in that time (though other than my clear coat and my Sally Hansen "Aquamarine Chrome" I think this has the biggest dent in it.)
This was the first part of the Xtreme Wear collection I ever purchased, and I should have listened to my initial feelings on it way back then and saved myself some trouble.
The polish consists of holographic microglitter suspended in a sheer, dark grey/black base. I did a lot of experimenting with this color in high school (I was a semi-goth chick with an obsession with things that sparkled), and I only ever found one use for this that I was happy with: 2 coats of "Night Lights" over two coats of Pure Ice "Touch Me Here." I tried wearing it on it's own and over every color I owned, and disliked every other combination.
On it's own, I just started layering. I think I got up to five coats before I gave up. It still wasn't at full opacity, the amount of glitter wasn't thrilling, and the background color turned a muddy, dull grey color that would be unflattering on just about everyone. In fact, more than two coats and it's just downright unsightly to my eye.

You can see that there's a LOT of glitter in the bottle. Now look at my ring finger. No, that's not a trick of the light. That's really how much glitter you get for two coats.
The only good things I can say about it are these: It dries faster than the other Xtreme wear colors I've tried, and it goes on evenly, which I can't say about them, either.
I have Xtreme Wear in three other colors: "White On," "Fuchsia Power," and "Sun Kissed." I bought "White On" first, because I needed a white. I know white is a notoriously hard color to work with, so when I had issues with the coverage and evenness of application, I was willing to dismiss it. I bought the other two at the same time, because I needed the colors and Target didn't have them in any other brands at the time. All three of them are thin, and should be used with a ridge filler. In addition, it takes at least three coats to get good, opaque, even coverage. They take forever to dry, except in the thinnest possible coats in which case they are "average" in my book, and out of all of my polishes, they are actually the most prone to flaking off!
You all know that sometimes I sound like a Sally Hansen ad around here, since that's what most of my polishes are. I like the Insta-Dri formula, but I hate the brushes. I've tried a Diamond Strength color in the past ("Diamonds and Rubies," which happens to be a dupe for the much cheaper Pure Ice "Siren", or vise versa, depending on how you look at it) and was underwhelmed. My favorite base/top coat has been discontinued, and the Insta-Dri top coat (which does not suffer from the funky brush issue, for some reason) tends to increase the propensity for peeling polish (yay, alliteration). I showed you one of their nail art pens, and you can see my thoughts on it over on my stash page (it's down at the bottom). Right now the only thing I've tried that they still currently make that I like is their cuticle pen (also near the bottom on the stash page), but I could probably skip that altogether and just use the Burt's Bees Lemon Butter. I've basically come to the conclusion that this will be a Sally-free blog from now on. I'll use up a couple of things--my top coats, and probably "Night Lights." But I want to replace "Fuchsia Power" and "Sun Kissed", and I am still on the hunt for a good white polish (right now I"m just using Maybelline Color Show "Porcelain Party", which is almost identical to "White On," except it dries slightly faster).
Do you guys even think it's worth swatching them? What do you do with disappointing polishes? Just pitch it?
Sunday, July 15, 2012
Summer Fun: Beach

I love layering polishes. It's such an easy way to create an effect, or expand your pallette.
I really had no idea what to do for this theme. At first I though I'd do nail art. But I didn't know what image/pattern to do, and I only have one brown, and it's not the right brown for a beach.
So I went a little further and thought, "Ocean." I love the ocean, and I love blue polish. A water marble, perhaps?
My forays into watermarble have not really been what I would call successful, however. They turn out okay...but not great. More practice is needed.

I did one marbled accent for this manicure, and layering for the rest. For the marble, I put down a base of Brash "Green Machine" (1 coat) and for the marble I used Maybelline Color Show "Porcelain Party," Sally Hansen Insta-Dri "Blue By," Sally Hansen Complete Salon Manicure "Calypso Blue," and China Glaze "Dorothy Who?"

On my thumb and pinky, I used a base of "Blue By;" for the ring finger I put down 1 coat of "Green Machine", and on my middle finger I used a single coat of Sally Hansen Chrome Nail Makeup "Aquamarine Chrome" (for those wondering, I added a few drops of nail polish remover to that one, which solved the thick/dry issue completely. It is now the fabulous one-coat polish I remember from high school once more).
On top of each of those, I did one coat of "Calypso Blue."
I love the way the layers came out. Each base brings out something different in the shimmer of Calypso, which is one of my favorite polishes. I LOVE blue nail polish--it is second only to my love of foils.

I know I've been kind of blah this week on the nail art front, but bear with me because I do have something special planned for Fav. Summer memory on Tuesday.
Speaking of which, what is your favorite white nail polish? I need something that's going to be opaque; I'm thinking I might have to resort to acrylic paint, if I have any left from my art school days. Is there such a thing as a good, opaque white?
Friday, July 13, 2012
Summer Fun: Ice Cream

I almost skipped today, because I am tired. Originally, I was going to work on this yesterday, but wound up playing amateur mechanic instead, trying to get my roommate's car running. Then today I worked 9 hours before I had to go grocery shopping. And I haven't been sleeping well. I thought about skipping this one all together, since I wasn't all that thrilled with the only idea I was able to come up with, but I already had the base color on and figured I might as well.
I was going to do this as a splatter. But again, too tired. So not in the mood for clean up.

Do you know how hard it is to get good lighting on your feet? Especially at 8 pm. Pardon the poor photo. I did take several more, but they came out even worse. Read: tired.
In the end, I decide that when it comes to mint chocolate chip, dots work just as well.
I used Brash "Green Machine" and S•X•Y "Dreamy Cocoa." My first time using the second one, and as of yet, no real opinion other than I like the color. I like the bottle shape (there's a picture of it on the stash page). I like prism bottles (i.e. bottles that are the same shape from top to bottom, rather than a pot with a handle brush). I think they are visually appealing in a mod sort of way, and are convenient to store. My problem is that since this one is a rectangular prism, rather than the usual cylinder, I can't get the cap to go back on straight. It's always offset by half a turn, no matter what I do. Most annoying.
P.S. I found Seche Vite at Target today for $4.99. It's the first time I've ever seen it there, and it was $1.50-$2 cheaper than I've seen it anywhere else, so I picked it up. Haven't used it yet, but I'm hoping it lives up to the hype!
Thursday, July 12, 2012
Quick Review: Burt's Bees Lemon Butter Cuticle Cream
Remember a couple of weeks ago when I picked up this from Target?

I've mentioned before that I adore the smell. I want to take a bite out of it. Probably not wise, but looking at the ingredient list it probably won't kill you, and is unlikely to even make you sick. It is certified 100% Natural, and not tested on animals.
 The back of the tin, so you can see the ingredients.
The base of the product is beeswax, so it has a bit of a waxy texture, and feels a bit greasy when you put it on, but no more so than some lotions and once it gets rubbed in it doesn't last for too long.
I started out using this on my cuticles, and have noticed a steady improvement in them (I should have taken a pictures of my right hand at the start of this so you could see how bad they were. They had actually cracked and separated themselves from the nail bed. It was bad. When they started bleeding, I figured something ought to be done). However, I've been using it in concert with the cuticle pen (see my stash page for more info), so I wasn't ready to attribute full success to the cream.
Then Monday night I was doing the prepwork for what would eventually become Wednesday's manicure and Friday's pedicure, and thought, "Hey, why don't I try this on my feet?"
I have what might be the driest skin on the planet. Eight glasses of water has little to no effect on it. I use lotion and moisturizer twice a day and my hands still look like the bottom of Death Valley. I have actually cut myself on the callous on my feet because they are so dry and hard.
So I took the Lemon Butter and rubbed it on my heels, the inside of the ball of my foot, and the side of my big toe, where the hardest, scratchiest, ugliest callouses were.
I won't say that they were gone. But within 24 hours, it was like I had new feet. The callouses felt smaller. They're softer. They're still pretty dry, but they aren't nearly as rough.
1 application.
24 hours.
Color me impressed.
I know that Burt's Bees does make a similar cream intended for feet, and after this I might look into it...but only after I've used up my Lemon Butter.
Verdict: Gimme more!

$5.99 for .6 oz/17 g, Target.
I've mentioned before that I adore the smell. I want to take a bite out of it. Probably not wise, but looking at the ingredient list it probably won't kill you, and is unlikely to even make you sick. It is certified 100% Natural, and not tested on animals.

The base of the product is beeswax, so it has a bit of a waxy texture, and feels a bit greasy when you put it on, but no more so than some lotions and once it gets rubbed in it doesn't last for too long.
I started out using this on my cuticles, and have noticed a steady improvement in them (I should have taken a pictures of my right hand at the start of this so you could see how bad they were. They had actually cracked and separated themselves from the nail bed. It was bad. When they started bleeding, I figured something ought to be done). However, I've been using it in concert with the cuticle pen (see my stash page for more info), so I wasn't ready to attribute full success to the cream.
Then Monday night I was doing the prepwork for what would eventually become Wednesday's manicure and Friday's pedicure, and thought, "Hey, why don't I try this on my feet?"
I have what might be the driest skin on the planet. Eight glasses of water has little to no effect on it. I use lotion and moisturizer twice a day and my hands still look like the bottom of Death Valley. I have actually cut myself on the callous on my feet because they are so dry and hard.
So I took the Lemon Butter and rubbed it on my heels, the inside of the ball of my foot, and the side of my big toe, where the hardest, scratchiest, ugliest callouses were.
I won't say that they were gone. But within 24 hours, it was like I had new feet. The callouses felt smaller. They're softer. They're still pretty dry, but they aren't nearly as rough.
1 application.
24 hours.
Color me impressed.
I know that Burt's Bees does make a similar cream intended for feet, and after this I might look into it...but only after I've used up my Lemon Butter.
Verdict: Gimme more!
Wednesday, July 11, 2012
Summer Fun, and I'm published!!
Today's manicure coincides with a very special event: the release of my first published work!

Artwork by A.K. Alexander (a.k.a the other half of the shoestring).

Summer Color: Flamingo Pink!
For this manicure, I stared with a base of Maybelline Color Show "Porcelain Party" on my ring finger and thumb, to make the water marble pop. The background on the other nails is Brash "Green Machine."


For the water Marble, I used my Color Zone neon pink and purple; Sally Hansen Hard as Nails Xtreme Wear "Fuchsia Power" and "Sun Kissed; Sally Hansen Insta-Dri "Lightening", and "Green Machine" just to tie it all together. (This is the tutorial I used for the water marble)
The flamingo is painted with "Fuchsia Power". The lettering and moose are done with my Claire's nail pen.


Artwork by A.K. Alexander (a.k.a the other half of the shoestring).
Birds of a FeatherHelp me make the shoestring reach a little further; purchase a short story! It's only $2.49 (Less than a bottle of China Glaze!) and can be read on your iPad, computer, or ereader of choice.Cursed to turn into a flamingo since the age of three, Eric hasn’t had the best luck with relationships. But that changes when he meets Dan. At least, he thinks it has until Dan is offered a job in another state, and asks Eric to come along. Can Dan handle the truth about Eric?
Then, there's the new guy in town: Colin. Eric can tell right from the start that Colin's got a full moon secret of his own. The question is, when it comes to a weremoose and a wereflamingo, can there ever really be common ground?

Summer Color: Flamingo Pink!
For this manicure, I stared with a base of Maybelline Color Show "Porcelain Party" on my ring finger and thumb, to make the water marble pop. The background on the other nails is Brash "Green Machine."

Close up shot of the ring finger. Yes, that is a moose shadow. Curious? Read the story!

For the water Marble, I used my Color Zone neon pink and purple; Sally Hansen Hard as Nails Xtreme Wear "Fuchsia Power" and "Sun Kissed; Sally Hansen Insta-Dri "Lightening", and "Green Machine" just to tie it all together. (This is the tutorial I used for the water marble)
The flamingo is painted with "Fuchsia Power". The lettering and moose are done with my Claire's nail pen.

Tuesday, July 10, 2012
Down the Yellow Brick Road
Well, not quite.
Today I have a couple of swatches for you by China Glaze: "Ruby Pumps" and "Dorothy Who?"
These are very similar: Sheer bases in primary colors, with loads of silver micro glitter.
They sparkle. Their names reference of of my favorite movies. And they go on like a dream. What's not to love? [ETA: all shots in this post are taken WITH a top coat. The glitter is great, but has an uneven texture. Adding a clear topcoat really makes it shine.]
First, we have "Ruby Pumps."

This is a bold, primary red. It's probably the closest thing to a true red I have in my collection (albeit it is a small one). A single coat goes on slightly pinkish. A second coat evens it out, and a third makes it just a bit darker--though in general it's not noticeable.
 This shot shows the color the best, even though you can hardly see the glitter. As far as glitter polishes go, this one is pretty subtle on first glance.
For these swatches, I used three coats on every finger except my ring finger, where I have two coats over Pure Ice "Siren," just so you can see the transparency. With thicker coats, you can't really tell the difference between this color on it's own and when it's used with a base coat. Those thicker coats take forever to dry, however (30+ minutes, at least, with an hour being preferable). Thinner coats will retain transparency, though it's not obvious in these photos.

Want a really cool effect? Apply three coats of this color, then dip a q-tip in polish remover and lightly drag it over your nail, just removing the topmost layer of color to reveal the silver glitter. It looks really cool and I wish I'd discovered it before I banged up this manicure and took it off. Next time, maybe.

For "Dorothy Who" I used the same technique: 3 coats on every nail except my ring finger, where I used a base of Sally Hansen Insta-Dri "Blue By." Once again, the difference is almost unnoticeable in the photograph, and even in real life it is quite subtle.

This is a very bright blue, almost peacock blue and very attractive to my eye. The glitter is the same as in "Ruby Pumps," but unlike in the red, the glitter actually shows up as being silver in this polish, and is much more eye catching. Once again, it's loaded with the stuff, and while the polish starts out sheer it only takes 2-3 coats to build up a decent amount of opacity.
 I do need to apologize; my camera does not like shiny, sparkly, or bright things. The most accurate color representation of this polish is on my middle finger in this shot. The others are far too turquoise-y.
I wore "Ruby Pumps" for three days under somewhat trying conditions (extreme heat, physical activity) and it suffered only a bit of tip wear. While it's easy to damage these colors in the drying phase, once they're on they hold up really well. "Dorothy Who" seemed to dry a bit quicker, but I think I also used slightly thinner coats on that one.

Overall, I love the colors and the formulas, and you'll probably be seeing a lot more of them here, both on their own and layered over other colors.
Subscribe to:
Posts (Atom)